
 1 | Project Setup & Templates
 2 | Data Structure
Part 1 | Models
Overview:
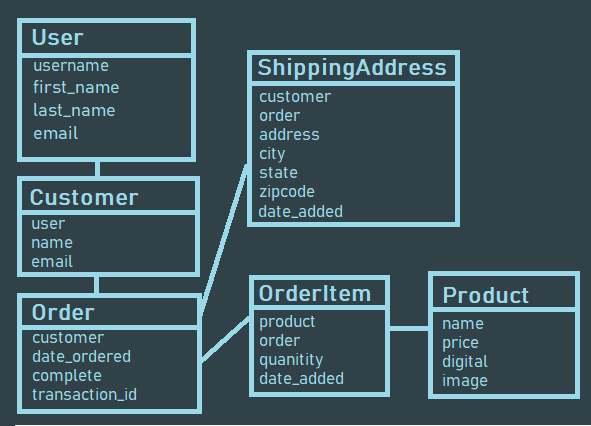
In this new module, part one will be about setting up our database/models. We will be working within our apps models.py, here we will create 5 models, not including the built in Django User model.
Database Models
I covered each model briefly in the “Introduction/Overview” section of this project but I’ll briefly recap each model here just in case you missed it.
1. User- Built in Dango user model. An instance of this model will be created for each customer that registers with our website. This model will give us the ability to later use Djangos default authentication system without having to manually set this up ourselves.
2. Customer - Along with a User model each customer will contain a Customer model that holds a one to one relationship to each user. (OneToOneField).
3. Product - The product model represents products we have in store.
4 .Order - The order model will represent a transaction that is placed or pending. The model will hold information such as the transaction ID, data completed and order status. This model will be a child or the customer model but a parent to Order Items.
5 .OrderItem- An order Item is one item with an order. So for example a shopping cart may consist of many items but is all part of one order. Therefore the OrderItem model will be a child of the PRODUCT model AND the ORDER Model.
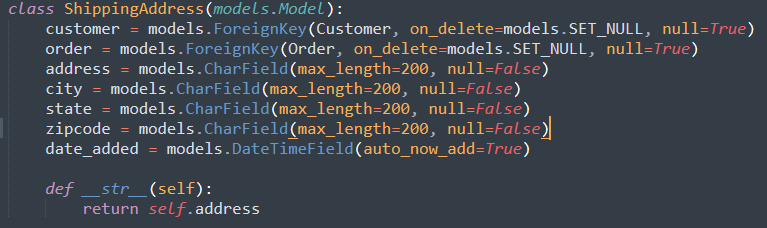
6. ShippingAddress- Not every order will need shipping information. For orders containing physical products that need to be shipping we will need to create an instance of the shipping model to know where to send the order. Shipping will simply be a child of the order model when necessary.
Step 1 | Import User Model
 00:02:00
First thing we will want to do is import the default Djagno user model inside our apps "models.py" file so we can create a OneToOne relationship for it.
Step 2 | Customer Model
00:02:17
The first model we will add will be the customer model. This model will contain 3 attributes.
1- User - A OneToOne relationship to the User model
2 - Name - CharField
3 - Email - CharField
Go ahead and create the model exactly how I have it in the image or just copy from the source code I provide with this step.

Step 3 | "Product", "Order" & "OrderItem" Models
00:04:37
Next we need to create 3 essential models that make up an order. Just a quick note we will add an image field to the product model in a bit so just ignore it for now.
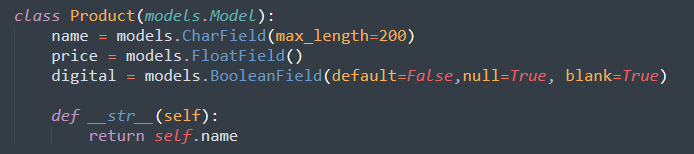
The product model will be comprised of a "name", "price" and “digital”. Digital will just be true or false and will let us know if this is a digital product or a physical product that needs to be shipped

As I stated earlier, an order will be the summary of items order and a transaction id. So in order is sort of like the cart and orderitems will be the items in the cart. The order Item model will be connected to the customer with a one to many relationship (AKA ForeignKey) and will hold the status of complete (True or False) and a transaction id along with the date this order was placed.

And finally we have the OrderItem. This model will need a product attribute connected to the product model, the order this item is connected to, quantity and the date this item was added to cart.
View Source CodeStep 4 | Shipping Model
00:11:54
Last we want to add the shipping address model. This model will be a child to order and will only be created if at least one orderitem within an order is a physical product (If Product.digital == False).
We will also connect this model to a customer so a customer can reuse the shipping address if needed in the future.
Step 5 | Migrate database
00:13:53
Ok, just to ensure things worked, let's run a migration.
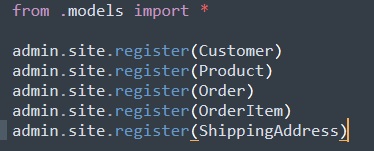
Step 6 | admin.py
00:14:45
Before we create a user and check our Django admin panel, let's not forget to register our models so we can see them. Open up your admin.py file in your app and import, then register each model individually.
Summary:
Create User
Now we can create a user and login to make sure all our models were properly registered.
python manage.py createsuperuser
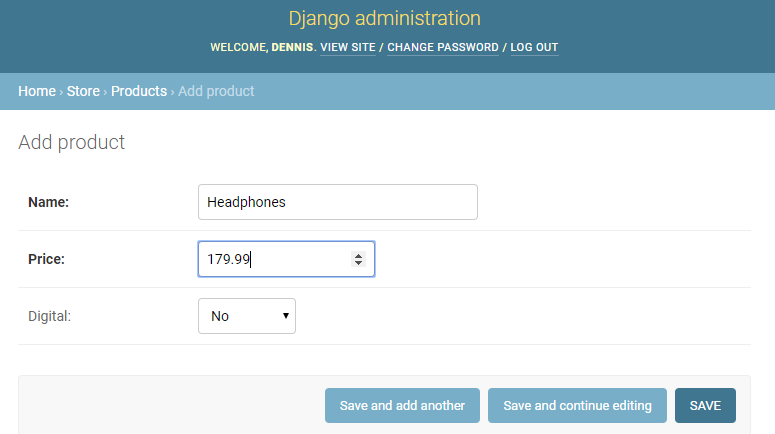
Create Products
Go ahead and create a few products from the admin panel. You can copy mine if you’d like :)
|
Product #1 Name: Headphones Price: 179.99 Digital: false |
Product #2 Name: Mount of Olives Book Price: 14.99 Digital: false |
Product #3 Name: Project Source Code Price: 19.99 Digital: true |
|
Product #4 Name: Watch Price: 259.00 Digital: false |
Product #5 Name: Shoes Price: 89.99 Digital: false |
Product #6 Name: T-Shirt Price: 25.99 Digital: false |