
 1 | Project Setup & Templates
Part 5 | Process Order
Overview:
It's time to complete the last part of this module and send off our form data for proccess orders.
We will first build out a view in the backend that will take our form data, then use the fetch API to send POST data from our submitFormData function.
Once we have our base view and POST request built in, we will finish this part with adding logic to our view to process orders.
Step 1 | Process Order View/url
 1:01:17
Let's first create our "view" and "url" pattern for our POST request to send data too.
View

URL Path

Step 2 | Send POST Data
1:03:14
Now we can create a post call and send the data to the backend. Remember, we still have access to the csrf token because we inherit from main.html
Inside our "submitFormData" function (checkout.html), let's create a post request using "fetch()".
Set the variable of "url" to the new path we just created in the last step. Next, add in the csrf token along with a Javascript object while nesting our user information and shipping data.
Remember to stringify the data.
Once we send the POST data, let's send the user back to our home page in the promise.

Step 3 | Transaction ID
1:07:51
To create our transaction ID; we won't do anything too fancy. There are many different methods we can use, but I'm going to use a simple time stamp.
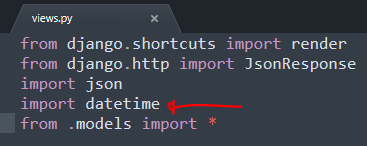
Import Date Time (views.py)
Set Transaction ID varible

Step 4 | Set Data
1:08:56
Now we want to parse the data sent from the post request and query/create some data if a user is authenticated. Again, we will ignore unauthenticated users until the next module.
We will use json.loads() to parse the data. Once we set the return value to the "data" variable, we can query the items inside as a Python dictionary.

Step 5 | Confirm Total
1:11:33
Because we will be sending the total from the frontend, we want to make sure that the total sent matches what the cart total is actually supposed to be.
We can do this by running a simple comparison from the total sent and our cart total.
Step 6 | Shipping Logic
1:13:06
Last, we need to create an instance of the shipping address if an address was sent.
We can add this just underneath our total confirmation. Check the source code link if you are unsure exactly where in the view we are adding this.
